webスクレイピングとやらをやってみたくて、Udemyの講座を受講した。
Pythonによるビジネスに役立つWebスクレイピング(BeautifulSoup、Selenium、Requests)
基礎から丁寧に解説してくれており、実際に手を動かしながらやってみる形式で、演習問題もあり、非常に良質の講座でした。
しかし、いかんせん脳みそが小さいものだから、習った内容が盛りだくさん(普通の人にとっては盛りだくさんではないのかもしれない)で、ごっちゃごちゃに混乱状態になってしまった。
で、整理するための備忘録その5です。
今回は、seleniumの醍醐味、ブラウザを操作する、というのをやってみようと思います。
ちなみにpython,webスクレイピングとも超初心者です。
ブラウザはGooGleChrome、コードエディターはjupyterNotebook(Anacondaに入ってたやつ)を使用しています。
selenium,webドライバーのインストール方法はUdemy講師の清水先生の記事が分かりやすいと思います
https://ai-inter1.com/python-selenium/
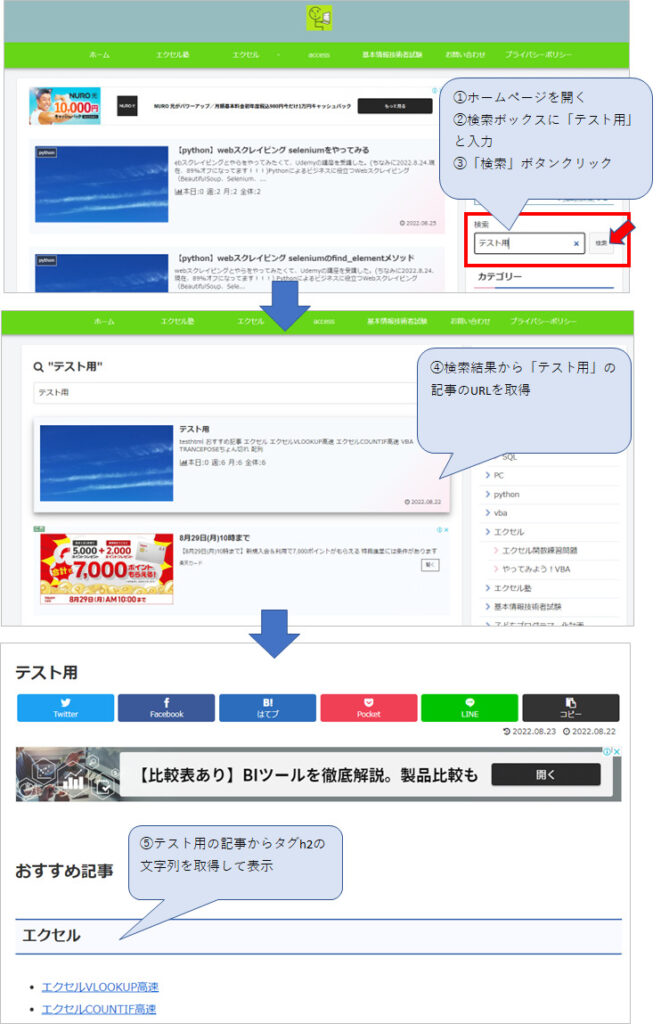
このブログのホームのページで「テスト用」を検索し、検索結果からテスト用のページに飛んで、テスト用のページからh2のテキストを持ってくる。というのをやってみようと思います。

1.やってみる
(1)ライブラリインポート、ホームページを開く
必要なライブラリなどをインポートします。今回はrequests、BeautiifulSoupも使います。
import requests
from bs4 import BeautifulSoup
from time import sleep
from selenium import webdriver
from selenium.webdriver.common.keys import Keys
from selenium.webdriver.common.by import By
driver = webdriver.Chrome("chromedriverの場所")
このブログのホームを開きます。
https://mwkexcelfriend.com/
url = "https://mwkexcelfriend.com/"
driver.get(url)
sleep(3)
(2)検索ボックスに検索ワードを入力
検索ボックスに検索ワード「テスト用」を入力します。
変数serch_wordに「テスト用」を代入しておきます。
seach_word = "テスト用"
検索のインプットボックスをデベロッパーツールで見てみるとこんな感じ。

要素を取得してelem_seachに代入。
send_keys(入力する文字列)で文字列を入力します。入力文字列は先に変数seach_wordに入れておいた「テスト用」です。
要素の取得は3通りやってみました。
①タグ名で検索
elem_seach = driver.find_element(By.TAG_NAME, "input")
elem_seach.send_keys(seach_word)
②クラス名
elem_seach = driver.find_element(By.CLASS_NAME, 'wp-block-search__input ')
elem_seach.send_keys(seach_word)
③xpath:タグ名+クラス名
elem_seach = driver.find_element(By.XPATH, "//input[@class='wp-block-search__input ']")
elem_seach.send_keys(seach_word)
(3)検索ボタンクリック
検索ボタンクリック。2通りやってみました。
検索ボタンはこんな感じ

①xpath:テキストに検索を含むbuttonタグ。クリックはclick
elem_seach_button = driver.find_element(By.XPATH, "//button[contains(text(),'検索')]")
elem_seach_button.click()
sleep(1)
②xpath:クラス名を指定したbuttonタグ。submitでもクリックと同じ動きができた。
elem_seach_button = driver.find_element(By.XPATH, "//button[@class='wp-block-search__button  ']")
elem_seach_button.submit()
sleep(1)
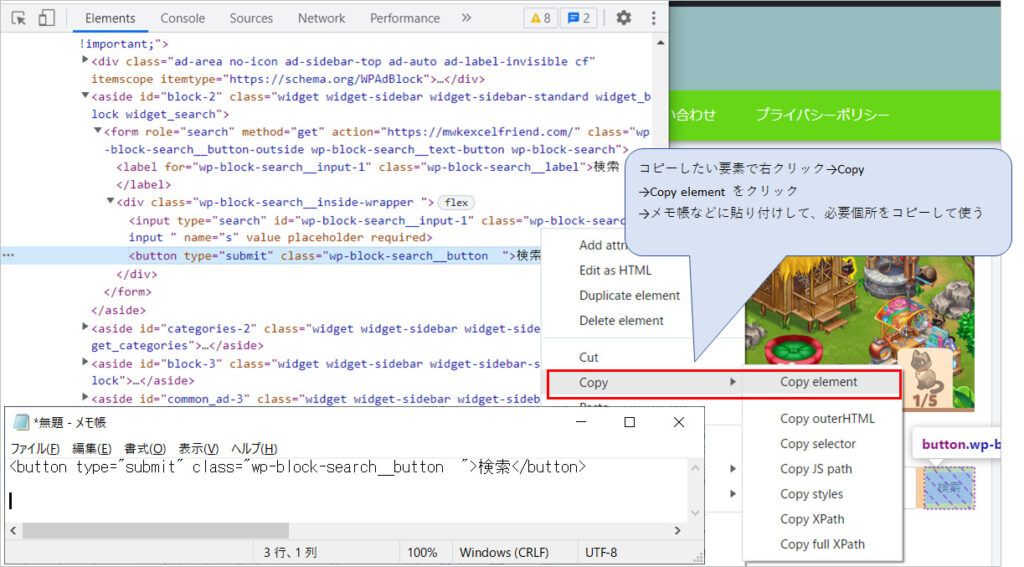
ちなみにクラス名とか長いと間違いなく入力するのは至難の業なので、デベロッパーツールからコピーしています。
コピーの仕方は、コピーしたいクラス名などがある要素のところで右クリック→Copy elementをクリック→メモ帳か何かに貼り付けして、使いたいクラス名やなんかをコピーする。

(4)検索結果から目的の記事のURLを取得
検索結果が表示されました。
さて、ここからどうするか。

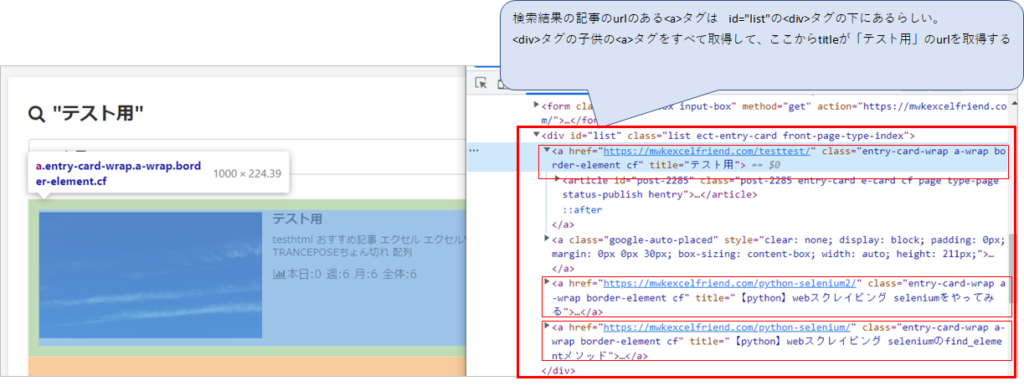
検索結果の記事のurlのある<a>タグは、<div>の下にあるらしい。その<div>タグの特定にはid=”list”が使えそう。
<div>タグの子供の<a>タグをすべて取得、という流れで行けそう。
とりあえず、id=list”の<div>の子供のaタグを出力してみました。
要素.get_attribute(“href”) でhref属性、つまりurlを出力します。
要素.get_attribute(“title”) でaタグのタイトルを出力します。
elems= driver.find_elements(By.XPATH,"//div[@id='list']/child::a")
for elem in elems:
    print(elem.get_attribute("href"))
    print(elem.get_attribute("title"))
結果はこうなりました。


タイトルが「テスト用」だったらそのurlにロックオン!ということにしたいと思います。
elemsにid=”list”の<div>タグの子供の<a>タグ要素をすべて代入。
elemsから一つずつ要素を取り出し(→elem)ifでtitleが「テスト用」かどうかを判定。
titleが「テスト用」だった場合、trg_urlにhref属性の値を代入(つまりURL)。
念のため、printでtrg_urlを出力してみる。
elems= driver.find_elements(By.XPATH,"//div[@id='list']/child::a")
for elem in elems:
    if elem.get_attribute("title") == "テスト用":
        trg_url = elem.get_attribute("href")
        print(trg_url)
        break
これであっているのかどうかわからないけど、とにかくテスト用のページのurlはter_urlに入れられた模様。以下、trg_urlをprintして確かめたもの。

(5)目的のURLの内容を取得し、<h2>タグを書き出しする(BeautifulSoupを使う)
さて、ここまで言ったら、BeautifulSopuを使ってやっていきたいと思います。seleniumよりその方がやりやすい(といわれている)。
requestsでtrg_urlを開き、BeautifulSoupで解析します。
res = requests.get(trg_url)
soup = BeautifulSoup(res.text,"html.parser")
テスト用ページから、h2タグを取得して出力
elems = soup.find_all("h2")
for elem in elems:
    print(elem)
出力結果
<h2 class="excel">エクセル</h2>
<h2 class="vba">VBA</h2>
<h2>Recent Posts</h2>
<h2>Recent Posts</h2>
2.コード全文
超初心者がやったものなので、これがベストとは言えません。。。
import requests
from bs4 import BeautifulSoup
from time import sleep
from selenium import webdriver
from selenium.webdriver.common.keys import Keys
from selenium.webdriver.common.by import By
driver = webdriver.Chrome("chromedriverの場所")

url = "https://mwkexcelfriend.com/"

driver.get(url)
sleep(3)

seach_word = "テスト用"

#elem_seach = driver.find_element(By.TAG_NAME, "input")
#elem_seach = driver.find_element(By.CLASS_NAME, 'wp-block-search__input ')
elem_seach = driver.find_element(By.XPATH, "//input[@class='wp-block-search__input ']")
elem_seach.send_keys(seach_word)
sleep(1)

#elem_seach_button = driver.find_element(By.XPATH, "//button[@class='wp-block-search__button  ']")
elem_seach_button = driver.find_element(By.XPATH, "//button[contains(text(),'検索')]")

#elem_seach_button.submit()
elem_seach_button.click()
sleep(1)

elems= driver.find_elements(By.XPATH,"//div[@id='list']/child::a")
for elem in elems:
    print(elem.get_attribute("href"))
    print(elem.get_attribute("title"))

#https://mwkexcelfriend.com/testtest/
#テスト用
#None
#
#https://mwkexcelfriend.com/python-selenium/
#【python】webスクレイピング seleniumのfind_elementメソッド

elems= driver.find_elements(By.XPATH,"//div[@id='list']/child::a")
for elem in elems:
    if elem.get_attribute("title") == "テスト用":
        trg_url = elem.get_attribute("href")
        print(trg_url)
        break

#https://mwkexcelfriend.com/testtest/

res = requests.get(trg_url)
soup = BeautifulSoup(res.text,"html.parser")
elems = soup.find_all("h2")
for elem in elems:
    print(elem)

#<h2 class="excel">エクセル</h2>
#<h2 class="vba">VBA</h2>
#<h2>Recent Posts</h2>
#<h2>Recent Posts</h2>
ふう。これでおしまいです。
webスクレイピング、めんどくさい。
参考とさせていただいたサイト
・selenium,webドライバーのインストール方法はUdemy講師の清水先生の記事です。
https://ai-inter1.com/python-selenium/
・python Selenium 学習:練習用ページがあり、解説を見ながらやってみることができる親切な記事
https://hitori-sekai.com/python/web-scraping/
・Seleniumの要素の取得方法
https://kurozumi.github.io/selenium-python/locating-elements.html
・Seleniumの基本的利用方法
https://qiita.com/motoki1990/items/a59a09c5966ce52128be
・Seleniumインストール方法から基本操作方法
https://nkmrdai.com/vba-selenium-reference/
python webスクレイピング 超初心者の備忘録シリーズ
- 【python】webスクレイピング BeautifulSoupのSELECTメソッド
- 【python】webスクレイピング BeautifulSoupのfindメソッド
- 【python】webスクレイピング seleniumのfind_elementメソッド
- 【python】webスクレイピング seleniumのfind_elementメソッド


コメント